Making a nice Blogger blog is fairly easy, although it requires some playing around to the proportions and colors pleasing.
I suggest putting down the $10/year to reserve your custom domain name, which allows you to not have /blogspot/ in your address. However, that's up to you.
When you're setting up your page, you'll first use a template:
 Choose a layout you like. It doesn't have to be exact, because you can change it.
The next thing to do is to change it. Hit "Customize."
 This opens a page with a header at top (shown) and a preview of the page on the bottom of your screen. I began by selecting "Background" and choosing a different image than the default as my background.
You can also adjust widths of the columns under "adjust widths."
The "themes" are the colors of your text. Don't worry, you can change those, too. I suggest choosing a theme with at least one color you like, so you don't have to change it manually.
Once you've gotten a background and theme color you more or less like, choose "Layout."

This lets you select how your blog page is laid out. You only get one blog per blog; all the other pages you can start from scratch and lay out however you want. If you want more than one blog, you can make another--I made four, one for practice, the main blog, one for short stories, and this one, for random how-to posts that don't quite fit the theme of the site.
Once you've chosen your general blog layout (I went with a sidebar for links and 2 columns of possible gadgets at the bottom, simple and not too overwhelming), hit "Advanced" to play with your color scheme.

A second column opens up with "Font," "Blog Title," etc. Each piece can be individually selected and the font and/or color set to your taste (Post titles are link-colored, so you don't get to adjust the color of those). When you select something, the preview will highlight it below (usually), so you see exactly what you're choosing a font for.
Some give you multiple options (namely, links).

I suggest choosing colors for "Link color" and "Visited color" with enough contrast from your background that they're still readable. Already-visited links appear in "Visited color" and not-yet-visited links appear in "link color."
The pre-made palates below each option are pre-chosen colors from your theme. If you dislike them, hit the black box with the color rectangle beside the #aaaaaa (6-number/letter color code) and select a custom color. Or just fill in the custom code manually if you know the color code you want--I took a palate I found elsewhere and chose colors that I thought complemented my color scheme, and entered those manually, then adjusted slightly if they weren't perfect.
After you've gotten the color selection you like, save and hit the "Back to Blogger" link in the top. Then go down to Layout.

This lets you add Gadgets, such as follow buttons, recommended links, and your "About Me" from your G+ profile (if you have one, or if not, you can make a custom one). You can move the gadgets around by clicking and dragging them around.
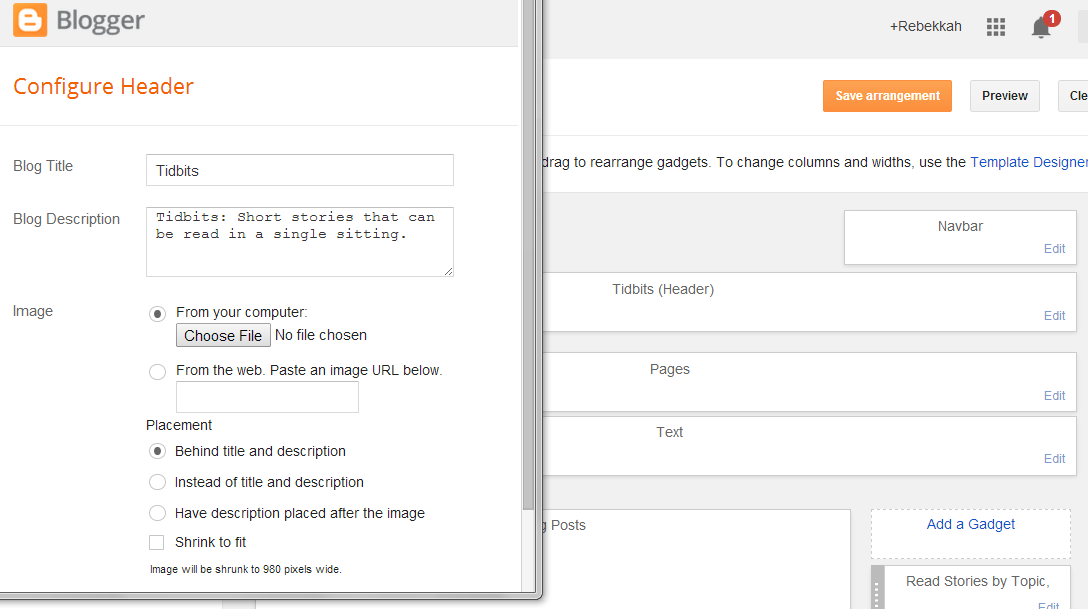
You should individually select and edit your Header. Click on the edit button (the picture below shows you the menu that will come up). This will allow you to edit the blog title, add a description (and don't be like me and misspell a word in that description when you first set it up--the misspelling continued to show up for 2 weeks after fixing it!). You can also add a custom image if you'd like.
When you've gotten the gadgets laid out as you like, if you want to have several pages to your blog, or link to external websites, click on the "Pages" gadget edit button.

You don't have to show every page in your tabs. Deselect any you don't want a tab directly to--you can still link to those pages internally within the site, but they won't show up in your tabs.
You can also link to external sites by clicking "+Add link page." You'll get a pop-up menu asking where you want to link to. Here, I've linked to my Blogger blog that has a few short stories and to my WordPress website.
You can't add pages to your tabs you haven't made yet. If you want to add a couple of pages, you'll have to the main sidebar's "Page" tab and make a new page.
When you're done, hit Save.
And that's Website Design 101: Blogger basics--using the Blogger features to customize your page!
Here's my main page: www.rebekkahniles.com
For Designing a Website 102, are there any custom features you see that you'd like to know more about?
I suggest putting down the $10/year to reserve your custom domain name, which allows you to not have /blogspot/ in your address. However, that's up to you.
When you're setting up your page, you'll first use a template:
The next thing to do is to change it. Hit "Customize."
You can also adjust widths of the columns under "adjust widths."
The "themes" are the colors of your text. Don't worry, you can change those, too. I suggest choosing a theme with at least one color you like, so you don't have to change it manually.
Once you've gotten a background and theme color you more or less like, choose "Layout."
This lets you select how your blog page is laid out. You only get one blog per blog; all the other pages you can start from scratch and lay out however you want. If you want more than one blog, you can make another--I made four, one for practice, the main blog, one for short stories, and this one, for random how-to posts that don't quite fit the theme of the site.
Once you've chosen your general blog layout (I went with a sidebar for links and 2 columns of possible gadgets at the bottom, simple and not too overwhelming), hit "Advanced" to play with your color scheme.
A second column opens up with "Font," "Blog Title," etc. Each piece can be individually selected and the font and/or color set to your taste (Post titles are link-colored, so you don't get to adjust the color of those). When you select something, the preview will highlight it below (usually), so you see exactly what you're choosing a font for.
Some give you multiple options (namely, links).
I suggest choosing colors for "Link color" and "Visited color" with enough contrast from your background that they're still readable. Already-visited links appear in "Visited color" and not-yet-visited links appear in "link color."
The pre-made palates below each option are pre-chosen colors from your theme. If you dislike them, hit the black box with the color rectangle beside the #aaaaaa (6-number/letter color code) and select a custom color. Or just fill in the custom code manually if you know the color code you want--I took a palate I found elsewhere and chose colors that I thought complemented my color scheme, and entered those manually, then adjusted slightly if they weren't perfect.
After you've gotten the color selection you like, save and hit the "Back to Blogger" link in the top. Then go down to Layout.
This lets you add Gadgets, such as follow buttons, recommended links, and your "About Me" from your G+ profile (if you have one, or if not, you can make a custom one). You can move the gadgets around by clicking and dragging them around.
You should individually select and edit your Header. Click on the edit button (the picture below shows you the menu that will come up). This will allow you to edit the blog title, add a description (and don't be like me and misspell a word in that description when you first set it up--the misspelling continued to show up for 2 weeks after fixing it!). You can also add a custom image if you'd like.
When you've gotten the gadgets laid out as you like, if you want to have several pages to your blog, or link to external websites, click on the "Pages" gadget edit button.
You don't have to show every page in your tabs. Deselect any you don't want a tab directly to--you can still link to those pages internally within the site, but they won't show up in your tabs.
You can also link to external sites by clicking "+Add link page." You'll get a pop-up menu asking where you want to link to. Here, I've linked to my Blogger blog that has a few short stories and to my WordPress website.
You can't add pages to your tabs you haven't made yet. If you want to add a couple of pages, you'll have to the main sidebar's "Page" tab and make a new page.
When you're done, hit Save.
And that's Website Design 101: Blogger basics--using the Blogger features to customize your page!
Here's my main page: www.rebekkahniles.com
For Designing a Website 102, are there any custom features you see that you'd like to know more about?


